Migrate Plex From VM to Docker
Time to Deprecate Plex VM
I’ve been running Plex since 2017 and for all this time it has been installed in an Ubuntu Virtual Machine via a Deb Package. This has been extremely reliable and I’ve been able to upgrade the underlying Ubuntu distribution and Plex versions without issue.
The basic Virtual Machine has remained relatively unchanged over time with the following specs:
- 8 vCPU (8 CPU cores given to Virtual Machine)
- 8 GB virtual Memory
- 30 GB virtual Storage Disk (4 Disk ZFS RAID 10 SSD array)
- Media mounted via NFS (was SMB prior to Windows 2012 R2 File Server decommission) to HDD NAS (4 Disk Btrfs RAID 6 array)
As the underlying Virtual Machine host has lots of CPU cores available I have never added a GPU for Transcoding, opting to just keep adding CPU cores as required.
Future Planning
The Virtual Machine host is starting to get quite old so I have been planning how I will eventually retire it (hopefully to something more power efficient). As part of this migration paths (as well as Disaster Recovery) have been at the front of all the decisions I have made.
The main “Plex Media” has been located on my Synology DS920+ NAS for quite some time now (since the Windows 2012 R2 File Server decommission) but the main Plex Configuration and Transcode storage is a Virtual Machine Disk.
It’s worth noting (listed above and will be covered in a below section) that the type of Disks (SSD vs HDD) is different. During the planning and migration this fact was overlooked.
Quite a while ago I had got an email from either Plex or Docker on migration of a Plex instance to a Docker Container. As I have had success with moving a lot of my other workloads to Docker (that were not moved to the Cloud), I thought this would be the ideal path moving forward. By moving to Docker this completely removes the requirement for upgrading the underlying Operating System that Plex runs on. This also removes another Virtual Machine which simplifies my infrastructure.
The final advantage of moving to a Docker Container is that as long as the underlying Container did not change the “Plex User”, eventually moving the Container from one Docker host to another “should just work” (famous last words).
Migration
To accomplish this I used the following resources:
- Plex Great Docker Migration
- GitHub Plex pms-docker Repository
- Docker Hub linuxserver.io Plex Image
- Google Search Gemini “AI Search”
Container Selection
The first challenge I faced was to select what Docker Image I wanted to use for
the Container. I had two choices the Plex provided one and another by by
linuxserver.io.
From my quick “Googling” the linuxserver.io provided one was faster to update
(both from a Plex Server and Image point of view) but was not the one provided
by Plex themselves. Ultimately, I chose to use the Plex provided one for no
other reason but to try and prevent issues in the migration.
Prepare Existing Plex Server
Navigate to Plex Settings -> Library, uncheck the “Empty Trash automatically after every scan”.
Stop plex instance and disable it from auto starting. If using Linux Systemd you can use the below commands.
sudo systemctl stop plexmediaserver.service
sudo systemctl disable plexmediaserver.service
Copy the Plex Preferences.xml file as you will need to reference this later.
For Ubuntu installations this can be found in following directory.
/var/lib/Library/'Application Support'/'Plex Media Server'
Docker Compose File (compose.yml)
Like all my other Docker services I have used Compose files to configure the Docker Container(s) and various Networking/Storage settings.
From the Plex Docker Repository linked above it had a sample Compose file to start with. Taking this I modified it and included a sanitised version below.
If you have a simple install and are going to use local storage/volumes you can use the default Compose file from Plex. See below.
services:
  plex:
    container_name: plex
    image: plexinc/pms-docker
    hostname: plex # Hostname (Network name not Docker name) container identifies as
    restart: unless-stopped
    ports:
      - 32400:32400/tcp
      - 8324:8324/tcp
      - 32469:32469/tcp
      - 1900:1900/udp
      - 32410:32410/udp
      - 32412:32412/udp
      - 32413:32413/udp
      - 32414:32414/udp
    environment:
      - ADVERTISE_IP=http://192.168.1.100:32400/ # Docker Host IP Address
      - PLEX_CLAIM=GENERATED_FROM_PLEX_CLAIM_WEBSITE # Claim token to use to "own" server. Remove after adoption.
      - TZ=Australia/Melbourne # Timezone for container
    volumes:
      - /path/to/plex/database:/config # Path to configuration
      - /path/to/transcode/temp:/transcode # Temporary folder for Transcode data
      - /path/to/media:/data # Path to media files (i.e. TV Shows/Movies)
As I’m using NFS the configuration is a little more complicated.
# NOTE: Replace anything between the "<>" tags (including the "<>") with
# appropriate values.
services:
  plex:
    container_name: plex
    hostname: plex
    image: plexinc/pms-docker
    restart: unless-stopped
    ports:
      - "1900:1900/udp"
      - "8324:8324/tcp"
      - "32400:32400/tcp"
      - "32410:32410/udp"
      - "32412:32412/udp"
      - "32413:32413/udp"
      - "32414:32414/udp"
      - "32469:32469/tcp"
    environment:
      - ADVERTISE_IP=http://<DOCKER_HOST_IP_ADDRESS>:32400/
      # - PLEX_CLAIM=<ONLY_REQUIRED_ON_FIRST_STARTUP>
      - TZ=Australia/Melbourne
    volumes:
      - database:/config
      - transcode:/transcode
      - media:/data

volumes:
  database:
    driver: local
    driver_opts:
      type: nfs
      o: "addr=<NFS_SERVER_IP_ADDRESS>,nolock,soft,rw"
      device: ":/volume1/Docker/plex/database"

  media:
    driver: local
    driver_opts:
      type: nfs
      o: "addr=<NFS_SERVER_IP_ADDRESS>,nolock,soft,rw"
      device: ":/volume1/Plex_Media"

  # Should this be on NFS or local temp storage?
  transcode:
    driver: local
    driver_opts:
      type: nfs
      o: "addr=NFS_SERVER_IP_ADDRESS,nolock,soft,rw"
      device: ":/volume1/Docker/plex/transcode"
WARNING: The above uses nolock,soft as options when mounting which is
probably not best practice here.
By using soft this will wait and then return an error if the NFS server is not
responsive but will allow the application to keep running. The nolock disables
the file locking.
Using the hard option is better for data integrity (especially when Databases
are involved) as will wait until the NFS server to come back online. However,
you cannot terminate any process that is “waiting” (for the NFS server to come
back up) unless the intr option is also specified. The intr option allows
the NFS requests to be interrupted if the server goes down or cannot be reached.
The NFS options are on my list to revisit (as a whole for all my services) but the above is what I used to perform the migration.
Plex Claim token
The “claim token” is used so that a given Plex Server can be associated to a Plex Account. This can be retrieved from https://plex.tv/claim.
This can be updated in the above compose file.
Initial Container Start & Configuration
The Plex Container can be started/restarted/recreated with the below command.
This will start the container in the background (daemon mode) forcing recreation
of the container even if there are no changes detected. The --force-recreate
is required as if there is not a new version of the underlying image a new
version of the Container will not be created.
docker compose up -d --force-recreate
This does leave an issue though. When we run the above command this creates a brand new “blank slate” Plex Server. This is not what we want to do as we want to migrate our existing Plex instance keeping sharing settings intact.
To accomplish this we need to edit the newly created configuration files to match the Existing Plex Server. You could copy the whole configuration file but as it is an old application that has gone through multiple upgrades I thought it better to just “clean slate” the whole install. The other issue this causes is that none of the metadata (Covers, subtitles, intro/credit detection, etc) is lost from the existing Plex Server and will have to be regenerated from scratch in the new Docker instance.
First stop the Docker Container with the below command.
docker compose stop
Locate the Docker instance’s Preferences.xml file and copy the following
property values for the following fields:
- AnonymousMachineIdentifier
- MachineIdentifier
- ProcessedMachineIdentifier
Save/Copy this modified file back to where the Docker instance created the file. If required you may have to update the ownership/group of the file depending on how the file was updated/overwritten. To accomplish this you can use the following commands (assuming these are accessible by the Docker host).
# Show permissions of other files in the Preferences.xml file directory
ls -l

# Update ownership group of Preferences.xml file
chown USER:GROUP Preferences.xml

# Verify permissions has updated.
ls -l
Before we start the Plex Container again regenerate a new “claim token” and update the Compose file above.
Recreate the Plex Container with the “–force-recreate” command above.
After a minute or two navigate to the “identity” URL on the server in a web browser to verify that the server has been successfully “owned”.
http://DOCKER_HOST_IP_ADDRESS:3400/identity
In the response you are looking at the “claimed” tag and that it has a value of “1”. The machine identifier should also mach the value copied from the existing Plex server. See below sample.
<MediaContainer
  size="0"
  apiVersion="1.1.1"
  claimed="1" <-- This is the value you are looking for
  machineIdentifier="<PROCESSED_MACHINE_IDENTIFIER>"
  version="1.42.2.10156-f737b826c"
></MediaContainer>
You should now be able to open your Plex client of choice (Mac/Windows) and complete the rest of the initial setup.
Remove Claim Token
IMPORTANT!
After successful setup you need to comment out/remove the “claim token” environment variable in the Compose file. This is to avoid issues in the future as it is only required during initial setup.
Remember to re-create the container with the “–force-recreate” option.
Let Metadata Regenerate
As I had not copied over the Metadata from the existing Plex Server to the new Docker instance this results in all the Metadata to be re-fetched from scratch. Depending on your library size this may take quite a while and use significant resources.
Issues
Docker Container Failed to “Own”
I had significant issues with getting the server to show up and be marked as “owned”. The “claim token” was refreshed a few times as well as ensuring that in the Docker Compose file there was no double quotes around the “claim token”.
Whether the quotes was the underlying issue I am still not sure of but regardless the logs said it successfully completed without errors but the Docker Server failed to show up in my Plex Mac Client (was unavailable or something).
# Do this (without quotes)
environment:
  - PLEX_CLAIM=SOME_CLAIM_TOKEN

# Do not do this (with quotes)
environment:
  - PLEX_CLAIM="SOME_CLAIM_TOKEN"
For the Love of IOps
The other issue that I noticed (and touched on this in an above section) is that when Plex was scanning the media the performance was not great in the UI. I have not investigated or pin pointed this but changing the main storage RAID array for the Plex “Configuration Database” has moved from a direct connected 4 Disk RAID 10 SSD array to a Gigabit Ethernet connected 4 Disk RAID 6 HDD array.
This array might not have enough IOPs (especially over Gigabit Ethernet). In the first image below you can see that CPU usage for each core is averaging around 60-80% and the network peaks at only 64 MB/second (so not maxing out). In the second image you can see the IOPs increases and the read latency has gone up to almost half a second. The array might not be able to keep up with all the random read/writes going on.
I checked the CPU, Memory & Network usage of the NAS during this period and they do not appear to be the bottleneck so I think this is Disk related. Currently in this NAS (Synology DS920+) I do not have any cache SSDs installed that may help.
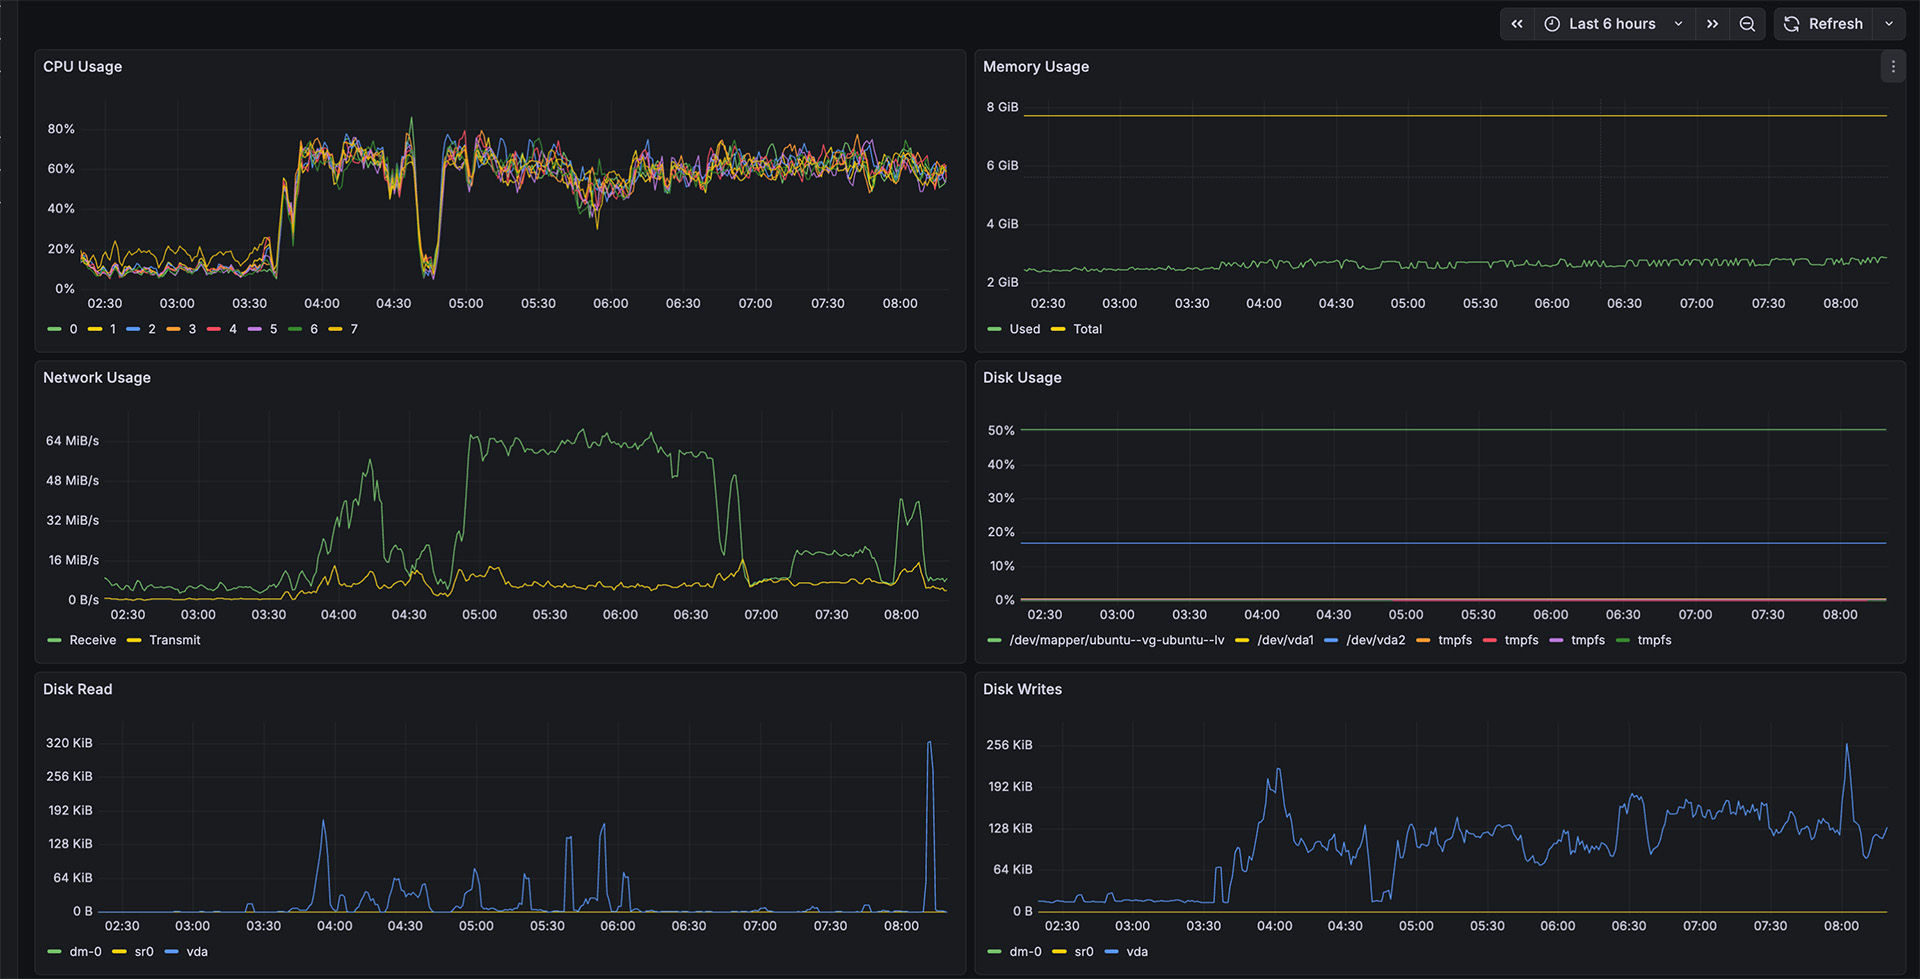
Plex Media Scanning Performance
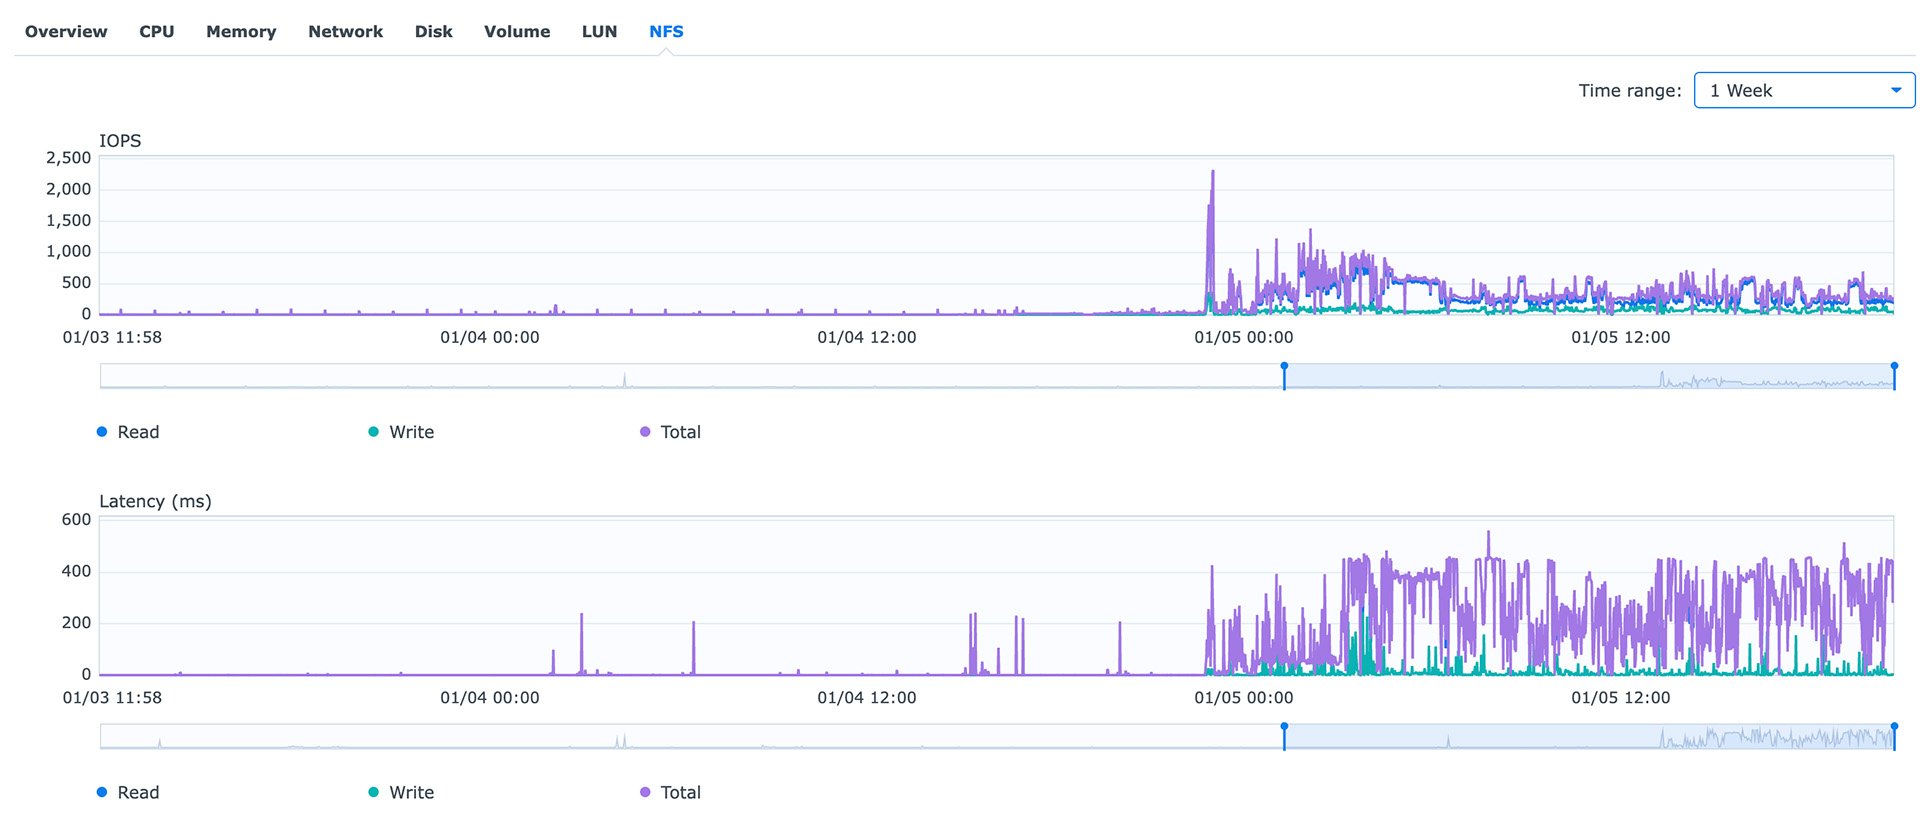
Plex NFS IOPs
I’ll have to wait until all the scanning of media has completed and I’ll update with what (if any) performance changes. I was able to watch an transcoded Blue-ray (1080P MKV to 720P) whilst the scanning was going without issue.